FAQ - White Metro Tiles
Posted by As'ad on 14th Apr 2025
Frequently Asked Questions about Metro Tiles
Q: Are white metro tiles still in style in 2025, or are they outdated?
A: White metro tiles are absolutely still in style – in fact, they’re considered a timeless choice. While tile trends in 2025 have expanded to include lots of colors and textures, classic subway tiles are “still holding strong” in popularity. Designers continue to use them because they have a universal appeal. Rather than looking outdated, they can actually make a design feel grounded. The key is how you style them: pair them with contemporary fixtures or trending colours and they’ll blend right into a modern 2025 interior. Essentially, metro tiles have become a neutral canvas that transcends fickle trends. So don’t worry about them going out of fashion – they’ve lasted over 100 years so far and aren’t going away anytime soon!
Q: Why are they called “metro” tiles?
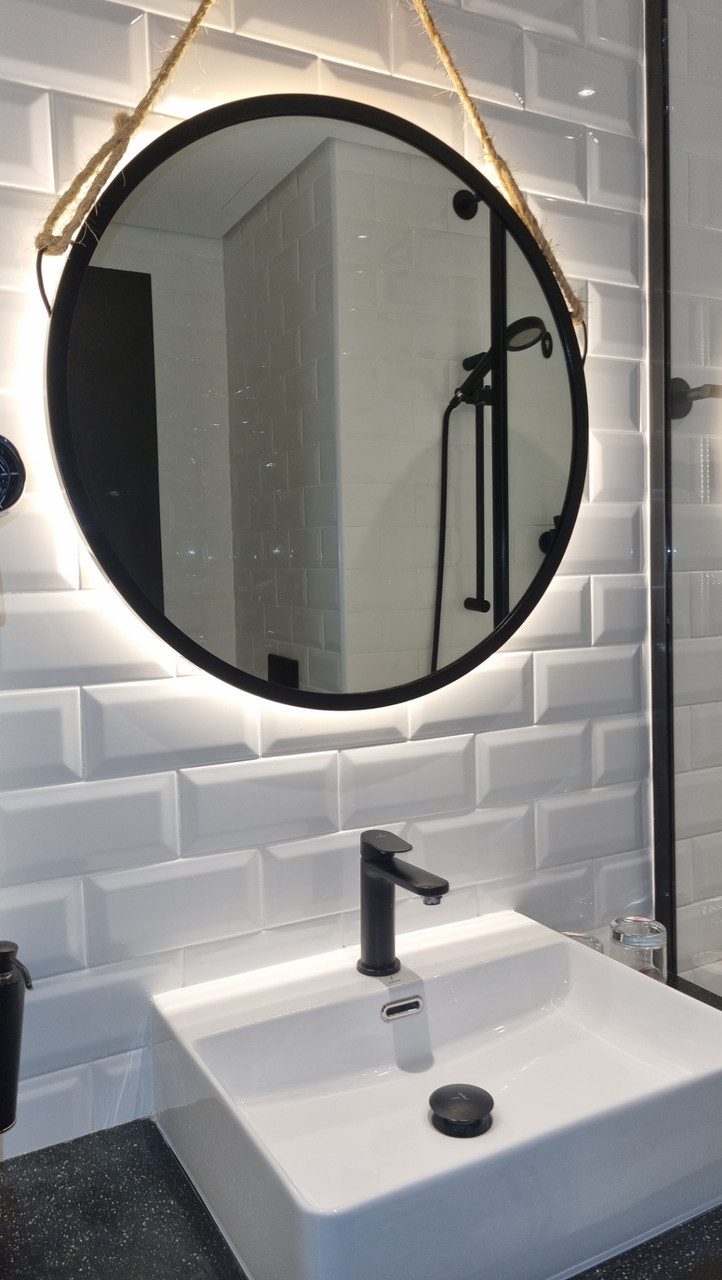
A: They’re called metro tiles because of their original use in the early 20th-century underground “Metro” stations of cities like London and Paris. The subway (or “metro”) stations used these glossy white rectangular tiles extensively on walls. The style caught on and eventually made its way into homes. In the US they’re often called subway tiles (same reason – named after New York City subways). So “metro” and “subway” tiles are the same thing. The classic size was roughly 3 x 6 inches (about 75 x 150mm) back then, but today 100 x 200mm (around 4 x 8 inches) is a very common size – which is the size we’ve been discussing here. The bevelled edge was also an early feature to help reflect light in those dim underground stations, a function it still serves in our interiors today.
Q: What’s the difference between bevelled metro tiles and flat metro tiles?
A: The difference is simply in the shape of the tile’s face. Bevelled metro tiles have edges that slope or angle down, creating a little raised center on each tile and a groove at the grout lines. This gives extra texture and shadow lines, which many feel adds character and a vintage vibe. Flat metro tiles have no bevel; they are completely flat on the surface, which gives a slightly more modern, clean-lined look. Bevelled tiles will create more pronounced grout lines (since the grout sits slightly lower than the tile surface) and catch the light differently. Flat tiles, especially with minimal grout lines, can achieve a very smooth, uniform appearance on the wall. There’s no right or wrong – it’s aesthetic preference. Flat tiles might be easier to clean just because there’s no indent at the edges, but honestly bevelled tiles are also easy to wipe down (the bevel is not steep). If you want that classic Paris subway look, go bevelled. If you want a contemporary twist on the look, flat could be the way to go.
Q: Is there a standard size for metro tiles?
A: The most popular standard size is 100 x 200 mm (10 by 20 cm), which is roughly 4 x 8 inches. This is the size sold by many UK retailers for “metro” or “subway” tiles – including the Metro White bevelled tiles we’ve been talking about here. However, there are other sizes available too. Some common variations include 75 x 150 mm (3 x 6 inches, a slightly smaller classic subway tile) and even larger formats like 100 x 300 mm (4 x 12 inches) for a more elongated look. There are also mini metro mosaic tiles at around 50 x 100 mm for creating detailed patterns. So while 100x200mm is something of an industry standard for that metro look, you can find other sizes if you want a different scale. Just note that if you mix sizes, the effect changes – smaller tiles mean more grout lines (busier look but can be charming), larger tiles mean fewer grout lines (sleeker look).
Q: What kind of grout is best with white metro tiles – white grout or colored grout?
A: This comes down to style and practical considerations. White grout with white tiles will give you a uniform, all-white look where the individual tiles blend together. This can make a space feel bigger and the tile installation feel more like one surface – it’s great for a clean, minimalist style. The downside is white grout can show dirt or discoloration over time, especially in areas prone to splashes (e.g., behind a cooker or in a shower). It will need cleaning to keep it bright. Grey or colored grout (light grey, medium grey, black, etc.) will frame each white tile, emphasizing the layout pattern. Darker grout is very practical as it hides stains or discoloration much better than white. A mid-grey grout with white tiles is a popular choice for kitchens and bathrooms because it’s the best of both worlds: not too stark, not too hard to keep clean. Black grout gives a striking contrast – a true vintage or industrial vibe – but keep in mind black grout can sometimes show efflorescence (a white haze) or soap residue, so it’s not completely maintenance-free either. There are also specialty grouts in colours like beige, blue, etc., but those are used more for design effect. Many UK homeowners default to a light grey grout with white metro tiles for a subtle contrast that’s easier to maintain than pure white. In the end, choose what looks best to you. If you seal your grout and clean occasionally, even white grout can stay pretty clean. And if it does get bad, grout can be refreshed or even re-grouted, so it’s not an irreversible decision.
Q: How do I keep the grout clean on white metro tile walls?
A: As covered in our maintenance tips, the main strategies are: seal the grout after installation (to buy yourself some protection), clean up spills quickly (don’t let coffee or hair dye sit on the grout too long, for example), and do occasional targeted cleaning. Using a grout-specific cleaner or a mild bleach solution can restore a lot of whiteness if your grout has discoloured. In showers, squeegee the tiles and grout after use to reduce soap scum buildup, and run the fan or open a window to reduce mold growth. There are also grout pens – basically like markers with paint – that let you “colour in” your grout lines back to white if they’ve become permanently stained or just dingy. Those can be a DIY fix to make grout look new. Using a slightly darker/off-white grout from the start is another tactic to keep a clean look with less anxiety. But overall, a gentle scrub periodically and keeping moisture in check will go a long way. The good news is that with metro tiles, grout lines are thin and the tiles are small, so there’s usually only a thin line of grout to worry about between each tile.
Q: Can I use metro wall tiles on the floor or outside?
A: Typically, no – standard metro tiles are meant for walls only. They are usually ceramic, which is perfectly fine for walls but often not sturdy enough for floors (ceramic wall tiles are thinner and can crack under heavy weight). Floors need tiles rated for floor use (often porcelain or thicker ceramic with higher break strength). If you love the look and want a coordinating floor, look for porcelain subway tiles or small brick tiles rated for flooring. As for outdoors, the issue is that ceramic can be porous and might absorb water; if that water freezes (in UK winters, for example), the tiles could crack or pop off. There are some porcelain versions of metro tiles that could be used outdoors on a sheltered wall, but in general, stick to using these metro bevelled tiles indoors on walls, as intended. They excel in kitchens, bathrooms, laundry areas, etc., but wouldn’t last on a patio floor or an exterior facade through frost cycles.
Q: Are metro tiles easy to install as a DIY project?
A: Relatively, yes. Many DIYers find that the 200x100mm size is quite manageable. You don’t have the challenges that come with very large tiles (like lippage or needing very even substrates), and you don’t have the fiddliness of tiny mosaic sheets either. You will need some basic tiling tools: a tile cutter (manual score-and-snap cutter works fine for ceramic metros, plus maybe a tile saw or bit for any outlet holes), tile spacers, adhesive, grout float, etc. The bevelled shape means you need to take a bit of care not to overfill the grout (you don’t want grout completely covering that bevel). But otherwise, it’s straightforward tiling 101. Many first-time tilers start with subway tiles. As one interior designer noted, even if you make a small mistake here or there, these tiles are forgiving and still tend to look “fantastic wherever you lay them”. Just plan your layout, keep things level, and don’t rush the grouting, and you can achieve a very professional look. If you’re unsure, start with a small area (like a backsplash) to build confidence. Plenty of guides and videos are available that specifically walk through how to lay metro tiles in different patterns.